
Setting up an environment in Windows. Installing Java and IDEA.
Java installation_
If you still don’t have Java installed on your PC, you can download JDK from the good old Oracle site (it’s free) -> https://www.oracle.com/java/technologies/downloads/#jdk19-windows.
JDK (Java Development Kit) is a set of development tools in Java. It contains all the necessary components which allow you to compile and run your code.
Here’s what you need:
- Check that you have a 64-bit operating system.
- Start -> Settings -> System -> About.
- Check if you have Java installed: open Windows Console/Terminal (Search -> cmd) type “java -version” and press Enter. If Java is installed, you’ll see its version; if not, you’ll see the corresponding message.
- Use the link to go to the Oracle site and download Java.
- Install Java by following instructions in the installer.
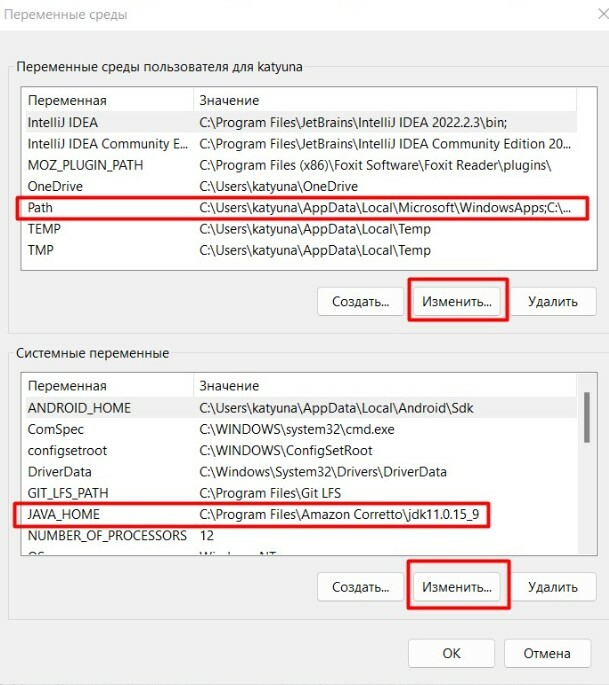
- Add the path to JDK to the system variables JAVA_HOME and Path. Search -> Edit the system environment variables. In the window that just opened, go to the “System variables”, click “Edit”, and add the path to JDK to the system variables JAVA_HOME and Path.
- Reboot your PC.
8. Make sure that Java has been installed.
Another way to install Java is by downloading the Amazon Corretto package -> https://aws.amazon.com/ru/corretto/. In this case, all changes to the system variables will be done automatically.
IntelliJ IDEA installation_
IntelliJ IDEA is a software development environment, in which developers and autotesters write their code. It has a smart editor, navigation, tips... and all the necessary tools to build and publish your software.
You can download the Community Edition (free) from JetBrains official site -> https://www.jetbrains.com/ru-ru/idea/download/#section=windows.
Start the installation and follow the instructions until you reach the “Installation Options” step. There you have to check all options in the “Create Associations” section—these are the file extensions which will be automatically handled by IDEA.
Maven installation_
Maven is a project management system which is used to download all necessary components, configure test parameters, run tests, and collect general information about test results.
You can download Maven from its official site: https://maven.apache.org/download.cgi.
Download and extract the ZIP archive and then add the path to the extracted files to the Path environment variable just as you did with JDK.
You can check if Maven is installed correctly by running the console command “mvn -v”. If everything is correct, you’ll see the Maven version info.
Git installation_
You can download Git from its official site -> https://git-scm.com/download/.
Run the installer, make sure to check the GitBash installation option. It’s an application that emulates the Git command line, you’ll need it to access all Git functions. You also need to check the “Use Git from command line” option.
To make sure Git is installed correctly, check the program version.
Open Windows Terminal and type “git --version” (just like you checked the version of Java).
If you want your coworkers to see, which changes were made by you, add your personal info into the Git configuration.
To do this, use the “git config --global” command in Windows Terminal to add your name and email:
git config --global user.name "My Name"
git config --global user.email me@email.mail
Now, to check if everything is correct, type “git config --list” in Windows Terminal.
Among other properties, you should be able to find your info: “user.name” and “user.email”.
Preparing your project_
To create a new project, open IDEA and select File -> New -> Project.
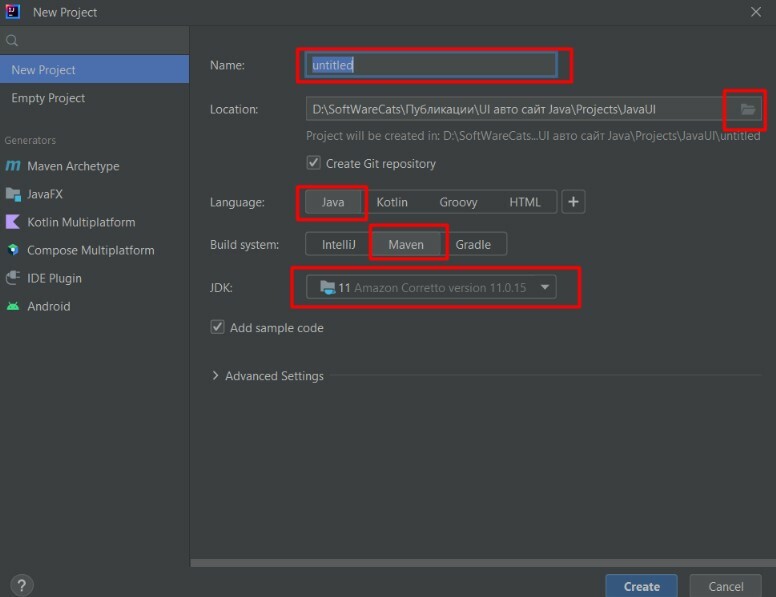
Enter project name, then choose language (Java), build system, and the JDK you will use. After doing all this, click “Create”. There you go, you've just created a project.
Another way to install Java is by downloading the Amazon Corretto package -> https://aws.amazon.com/ru/corretto/. In this case, all changes to the system variables will be done automatically.
IntelliJ IDEA installation_
IntelliJ IDEA is a software development environment, in which developers and autotesters write their code. It has a smart editor, navigation, tips... and all the necessary tools to build and publish your software.
You can download the Community Edition (free) from JetBrains official site -> https://www.jetbrains.com/ru-ru/idea/download/#section=windows.
Start the installation and follow the instructions until you reach the “Installation Options” step. There you have to check all options in the “Create Associations” section—these are the file extensions which will be automatically handled by IDEA.
Maven installation_
Maven is a project management system which is used to download all necessary components, configure test parameters, run tests, and collect general information about test results.
You can download Maven from its official site: https://maven.apache.org/download.cgi.
Download and extract the ZIP archive and then add the path to the extracted files to the Path environment variable just as you did with JDK.
You can check if Maven is installed correctly by running the console command “mvn -v”. If everything is correct, you’ll see the Maven version info.
Git installation_
You can download Git from its official site -> https://git-scm.com/download/.
Run the installer, make sure to check the GitBash installation option. It’s an application that emulates the Git command line, you’ll need it to access all Git functions. You also need to check the “Use Git from command line” option.
To make sure Git is installed correctly, check the program version.
Open Windows Terminal and type “git --version” (just like you checked the version of Java).
If you want your coworkers to see, which changes were made by you, add your personal info into the Git configuration.
To do this, use the “git config --global” command in Windows Terminal to add your name and email:
git config --global user.name "My Name"
git config --global user.email me@email.mail
Now, to check if everything is correct, type “git config --list” in Windows Terminal.
Among other properties, you should be able to find your info: “user.name” and “user.email”.
Preparing your project_
To create a new project, open IDEA and select File -> New -> Project.
Enter project name, then choose language (Java), build system, and the JDK you will use. After doing all this, click “Create”. There you go, you've just created a project.
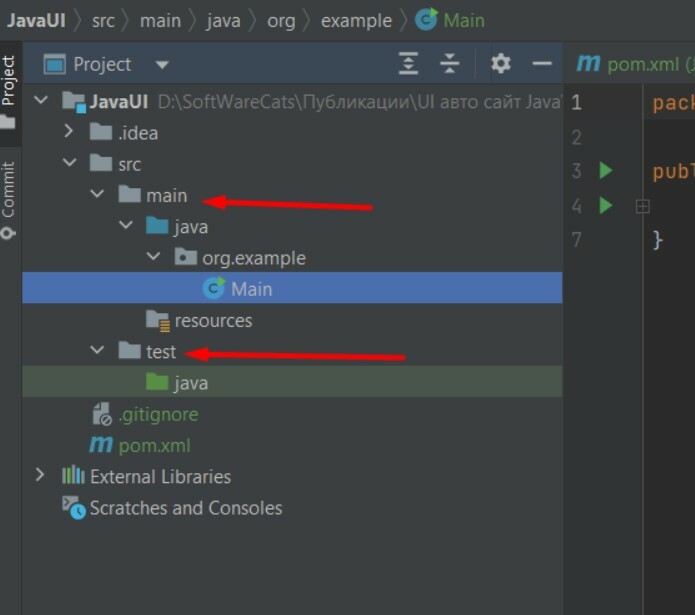
Now let’s expand the project file tree in the left menu of IDEA and open the “src” folder. That’s the folder where we’ll keep the project files (“Main -> Java” folder) and the test files (“Test -> Java” folder).
And that’s it! Now we’re ready to write an autotest!