Quick Guide to Git_
A software project is usually done by multiple people. Different modules can be made by different people, testing can be done by someone who didn’t even write the code, etc. To store the code online and allow simultaneous work on it, we need special services like GitHub or GitLab.
One of the main features of such services is tracking the changes made to the files.
To do it, these services use a special utility for tracking changes—Git. By using Git, you can roll back a project to a previous version, compare changes in project versions, merge these changes, etc.
A place where your code or files are stored (along with the changes history) is called a repository.
Repositories can be local (in fact, any local folder on your HDD can be used as a repository) and remote (external), the latter represents versions of your project kept on a remote server.
Let’s create both local and remote repositories and link them to each other.
The folder where you keep your files won’t become a repository by itself. First, you have to initialize a repository, i. e. inform Git that it should start tracking changes in the files which are kept in this folder.
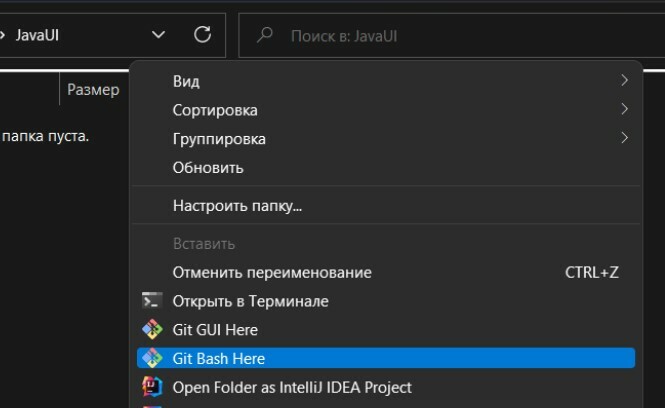
To do it, you need to open the project folder and launch Git from the right-click menu.
A software project is usually done by multiple people. Different modules can be made by different people, testing can be done by someone who didn’t even write the code, etc. To store the code online and allow simultaneous work on it, we need special services like GitHub or GitLab.
One of the main features of such services is tracking the changes made to the files.
To do it, these services use a special utility for tracking changes—Git. By using Git, you can roll back a project to a previous version, compare changes in project versions, merge these changes, etc.
A place where your code or files are stored (along with the changes history) is called a repository.
Repositories can be local (in fact, any local folder on your HDD can be used as a repository) and remote (external), the latter represents versions of your project kept on a remote server.
Let’s create both local and remote repositories and link them to each other.
The folder where you keep your files won’t become a repository by itself. First, you have to initialize a repository, i. e. inform Git that it should start tracking changes in the files which are kept in this folder.
To do it, you need to open the project folder and launch Git from the right-click menu.
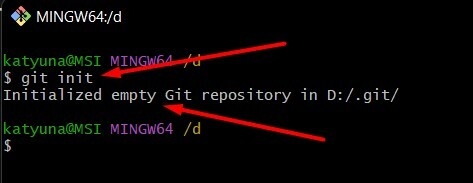
A command line will appear where you should type and execute the “git init” command. After that, Git notifies you about repository initialization.
From now on, Git will start tracking changes in the files of this repository, but first you need to specify the files to be tracked.
Git uses a number of file statuses.
Untracked—a file that Git “doesn’t see” yet and doesn’t track changes for.
Unmodified—a file that is already being tracked but has not been changed yet.
Modified—a file that has been changed (Git tracks the file but has not recorded any changes yet).
Staged—a file added to the index (ready to commit).
As soon as a file is committed (all the changes are recorded by Git), it will be marked as “Unmodified” again.
When you add a new file into the initialized repository, it is automatically marked as “Untracked”. You can make changes to the file, but Git won’t track them. For Git to “see” this file, you need to add it to the index; then the file is marked as “Staged”.
To check your file’s status, use the “Git status” command.
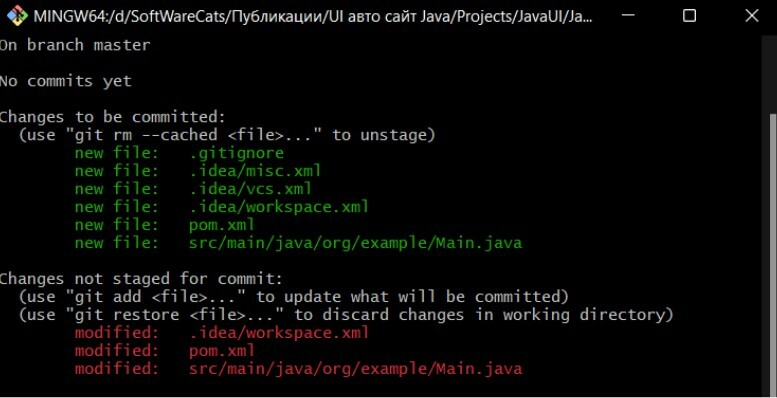
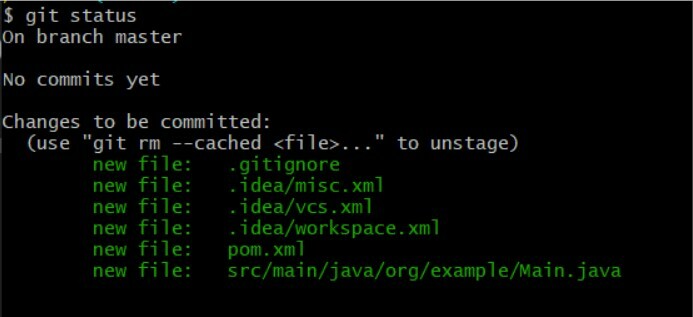
Git will display a list of uncommitted files and suggests adding new files to the index by using the “git add” command with the filename. You can add all new files at once by using the “git add --all” command.
Let’s execute the command. Now we can see that all files in the repository are ready to be committed.
Let’s execute the command. Now we can see that all files in the repository are ready to be committed.
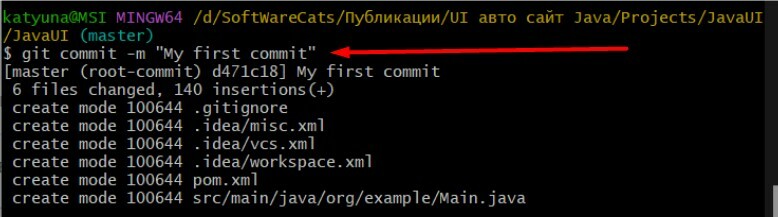
To save changes to a file (to commit it), you need to run the “commit” command with the “-m” key ("-m" stands for message). The key is usually followed by a comment explaining the changes done to the file, e. g.: git commit -m "My first commit".
To view the list of previous commits, use the “git log” command.
Information on how to find a certain commit in the history, how to view it, how to roll back to a certain version, and on many other functions can be found in the official Git documentation https://git-scm.com/doc.
Branching_
Another important Git feature that we’re going to need is branching. Branching is a parallel development of a project in multiple lines, i. e. separating project versions and working on them independently.
When you initialize a repository with the “git init” command, it automatically creates the main branch. It's usually called the master (or main) branch and contains the main stable version of the project.
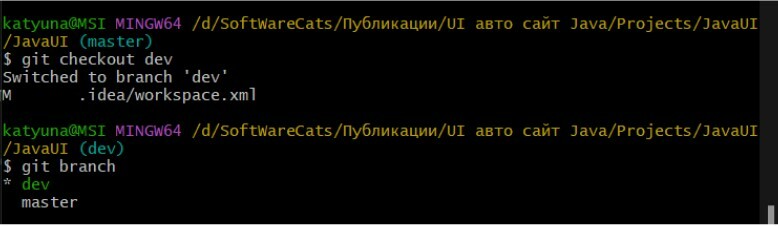
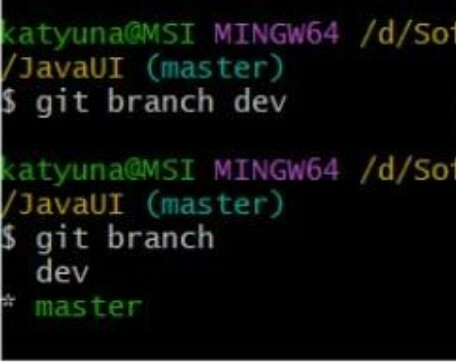
You can check which branch you are currently in by using the “git branch” command.
To keep the main branch safe from errors which may appear during tests development, you can create another branch and work in it. This branch can be named whatever you like. To create a branch, use the “git branch branch_name” command (where branch_name is the name of your new branch).
Information on how to find a certain commit in the history, how to view it, how to roll back to a certain version, and on many other functions can be found in the official Git documentation https://git-scm.com/doc.
Branching_
Another important Git feature that we’re going to need is branching. Branching is a parallel development of a project in multiple lines, i. e. separating project versions and working on them independently.
When you initialize a repository with the “git init” command, it automatically creates the main branch. It's usually called the master (or main) branch and contains the main stable version of the project.
You can check which branch you are currently in by using the “git branch” command.
To keep the main branch safe from errors which may appear during tests development, you can create another branch and work in it. This branch can be named whatever you like. To create a branch, use the “git branch branch_name” command (where branch_name is the name of your new branch).
But keep in mind that creating a new branch doesn’t automatically move you into it. You are still in the main branch of your project. To go into the newly created branch (or any other branch), use the “git checkout branch_name” command (where branch_name is the name of the desired branch). Alternatively, you can use the “-b” key to automatically move to a new branch after creating it, e. g.: git checkout -b branch_name.